BLOG
For machine vision engineers, selecting the right machine vision lighting technique is crucial to capturing high-quality images that enable accurate system performance. The type of illumination used can significantly impact image contrast and recognition results. This blog will explore two key lighting methods—Bright Field and Dark Field—highlighting their differences, advantages, and how to choose the right technique for your specific imaging needs. We’ll cover factors such as sample types, image contrast, ease of use, and versatility to help you make informed decisions for optimal machine vision setup.
Key Differences Between Bright Field and Dark Field Lighting
Bright Field (BF) emphasizes simplicity, illuminating the entire sample uniformly such that the sample appears as a dark image against a bright background. In contrast, Dark Field (DF) eliminates scattered light to produce a dark background with bright, high-contrast specimens, making it ideal for unstained or transparent samples. These methods form the foundation of effective lighting choices in machine vision.
1. Illumination Technique
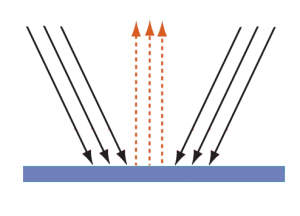
Bright Field: Utilizes reflected light to create bright images, with the light source positioned at an angle of 45-90 degrees relative to the sample. The technique captures light reflected directly into the camera.
Dark Field: Captures scattered light instead of reflected light. A low-angle light source (10-15 degrees) highlights edges, defects, and ridges by emphasizing scattered illumination.
2. Image Characteristics
Bright Field: Produces bright images but may struggle to define surface defects such as engravings, scratches, or indentations. Reflective surfaces often create bright spots due to excessive light reflection.
Dark Field: Enhances visibility of edges and surface imperfections by capturing only scattered light. It is particularly effective for inspecting reflective or mirrored surfaces.

3. Surface Analysis
Bright Field: Less effective for detecting small defects or imaging reflective surfaces, as direct reflections can obscure details.
Dark Field: Excels at detecting subtle features like ridges, scratches, and edges, making it a preferred choice for detailed surface analysis.
4. Setup Considerations
Bright Field: Light sources are positioned at small angles for broader coverage and reduced glare.
Dark Field: Requires lighting to be set up at 45 degrees or sometimes lower to optimize the scattering effect and minimize reflections from smooth surfaces.
Choosing the right lighting technique is essential to meet specific imaging requirements, and the next section will guide you through the factors to consider when selecting between Bright Field and Dark Field lighting for your application.
Choosing the Right Lighting Technique
Below are the main considerations to guide your decision:
1. Application Purpose
Clearly define the inspection goal. For surface inspections, such as detecting defects or analyzing printed text, front illumination (light from the camera side) is ideal. Selecting the proper angle and optical properties (diffuse or direct light) depends on the surface features to be highlighted.
For measuring dimensions (e.g., diameter, length) or detecting through-holes, back illumination is preferred as it maximizes contrast at object edges. Complex scenarios, such as imaging transparent materials, may require a combination of techniques to achieve the desired result.
2. Illumination Angle
Bright Field: In front light setups, light reflected from flat surfaces is collected by the optics, creating dark areas for features like scratches that scatter light outside the lens’s acceptance angle. In backlight setups, bright field collects light blocked or transmitted by the sample, emphasizing opaque or transparent areas.
Dark Field: In front light setups, scattered light from non-flat features is captured, highlighting these areas as bright on a dark background. In backlight setups, light scattered by non-flat features is similarly enhanced against a dark field.
3. Wavelength and Optical Performance
Choosing the right wavelength is crucial for optimizing the optical system. Monochromatic lighting simplifies the system by reducing chromatic aberrations, improving stability and efficiency.
Factors to consider include the sample’s surface properties (opaque or reflective), the desired resolution (shorter wavelengths offer higher resolution), system complexity, and the availability of illuminators at specific wavelengths.
4. Working Distance
For dark field illumination, a small working distance (typically within an inch) is often required. The dark field LEDs should be mounted at an angle of at least 45 degrees or more to achieve the desired scattering effect.
By carefully analyzing these factors, machine vision engineers can select the lighting technique that best suits their specific application needs.
Conclusion
Whether you need Bright Field or Dark Field illumination, understanding factors like application purpose, illumination angle, wavelength, and working distance ensures you capture the best image quality for your needs.
With over two decades of experience in designing and developing LED lights and structured light lasers, ProPhotonix is a trusted partner for machine vision lighting solutions. Our experts can help you design the ideal setup to enhance image quality, improve throughput rates, and achieve your vision system goals. Contact us today for personalized advice and support.